@DrunkBuzzFeed is an semi-automated Twitter bot that I built. I break up a bunch of headlines from Buzzfeed into 3 parts, and put them in a Google Drive spreadsheet. Through a variety of automation services, the headline parts are strung together and tweeted out 9 times a day. Using this guide, you should be able to make something similar (or even identical) yourself. I encourage you to do so.
No coding is required. The only thing you need to have to start this tutorial is a computer running OS X. This tutorial was made using 10.9 Mavericks, but it would probably work with older versions as well. It would be to your benefit if you were able to leave this computer on all the time, with persistent internet access but this (probably?) isn’t required for operation.
Follow this guide, look at the screenshots (click on them to see them full size), and don’t give up. Good luck!
1. Get a new Google account, Make sure Dropbox is installed on your computer, get a new Twitter account.
Click here to sign up for a new Google account. It doesn’t really matter what you call it. Don’t use a Google account you already have.
If you’ve already got a Dropbox account and the Dropbox OS X app is already installed on your computer, move along to the next paragraph. If you don’t already have a Dropbox account (what’s wrong with you?), click here to sign up for one. If you don’t have the app installed on your computer, go here and install it.
Finally, sign up for a new Twitter account. This will be where your automated tweets are posted from. Sign up with the email address you just created to keep things straight.
2. Collect content
For @DrunkBuzzFeed, the content is made up of parts of Buzzfeed headlines. Since I hate Buzzfeed, I didn’t want to go there and collect the content myself, so I made the automator service IFTTT (If This Then That) do it.
Even if your content isn’t Buzzfeed headlines, sign up for an account because you’ll need it later. If you already have an account, it’s fine to use that one.
IFTTT calls their automations “recipes”. I made a set of recipes that collect new headlines from every Buzzfeed category, and puts them in the same Google Drive document. You’ll have to connect your Google Drive to your IFTTT to use this recipe, but they’ll walk you through that.
Here’s a sample recipe. I made one of these for each Buzzfeed headline category, but they all end up in the same document.
3. Break up content

When I’m ready to add new content to @DrunkBuzzFeed, I select all the headlines (command+a), cut them (command+x) and paste them (command+v) into a new TextEdit document. TextEdit’s a program that’s already on your computer.
Once I’ve got the contents pasted into TextEdit, I turn the document into plain text (command+shift+t) but that’s personal preference. Then I start breaking the content up with the tab key. I break each headline into 3 parts, so that means I’ll put 2 tab breaks in each headline. It should look something like this:

Once you get everything set up, this step and the next one will be the only thing you do to keep your bot fresh. It’s also the only place you have any kind of creative control. Have some fun with it!
4. Input content
Copy all of your newly separated headlines (command+a, command+c). Head back to Google Drive, and make a new spreadsheet. Name it something you’ll remember
On Sheet 2 (trust me) of your spreadsheet, paste (command+v) all of your headlines. BAM! All your Tabs have turned into new cells.

5. Randomize content to create a piece of new content
So now you’ve got all the parts in place, and here’s where the real automation magic comes into play. For ease of organization, make a Sheet 3, and do this step there.
Next, Follow this guide which does a great job of explaining spreadsheet formulas. Change things as they apply to you. Here’s what mine looks like

As you can see, @DrunkBuzzFeed is chosen from 3 columns of 298 choices. That gives it a possible output over 25,000,000 tweets, assuming each cell was unique.
At this point, you should have a cell that puts together 1 choice from each column, forming something new in a single cell. Now, make Sheet 4 and make cell A1 point to that end product. It might be something like “=Sheet3!A3”. If you’re doing it right, it should display the same thing as your end product on Sheet 3. This is what mine looks like:

6. Get the tweet out of Google Drive and format it
A couple last things before we can get out of Google Drive. First, make your spreadsheet public. I don’t know 100% if this is necessary, but you’re going to be calling on it from another service later, so it can’t hurt. To do this, click the blue “share” button at the top left of the window, and select this option:

Finally, in your spreadsheet, go to File > Publish To Web. For your settings, if you’ve followed all my advice, “Sheets to Publish” should be set to Sheet 4, Automatically Republish when changes are made should be checked, Get a link to published data should be “TXT (Plain Text)” and your cells should be set to A1. I didn’t follow all my advise, so here’s what mine looks like:
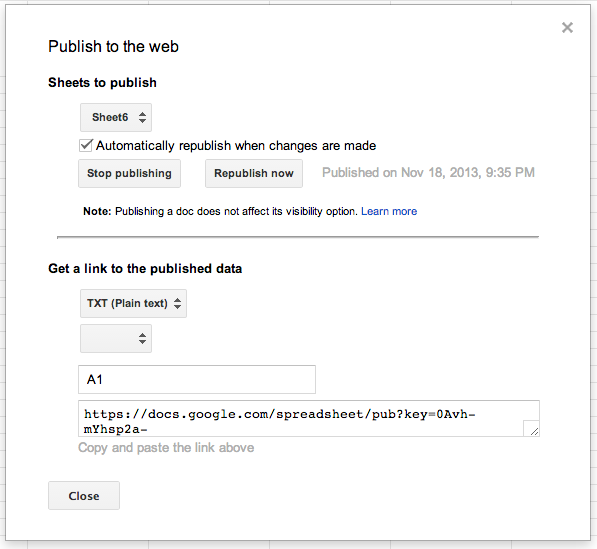
Copy and paste that link at the bottom into a new browser window. You should also save it somewhere for later. If you’ve done your job right, SpreadSheetName.tsv should download. Here, try mine. Open that with text edit, and it should be one line that’s a combination of 3 Buzzfeed headlines. Now how do you turn that into a Tweet? This is the part that had me stumped for the longest time. We’re going to turn to an OS X app you’ve probably never used before called Automator. It should be in your Applications folder. If you can’t find it, bring up spotlight (command+space) and search for it.
Open Automator, and navigate to File > New > Application. Yeah, you’re making your own application. Heads up: we’re going to be using the app’s search bar a lot to work quickly. We’re going to do 5 easy tasks.
Task 1: Get Specified URL
Find the “Get Specified URL” task with the search bar. Make the only URL in there the one that comes from your Google Drive spreadsheet. It should look like this

Task 2: Download URLs
This is going to allow you to save that file into a folder of your choosing. The folder you choose should in your public Dropbox folder, and should be used only for this purpose. Here’s what mine looks like:

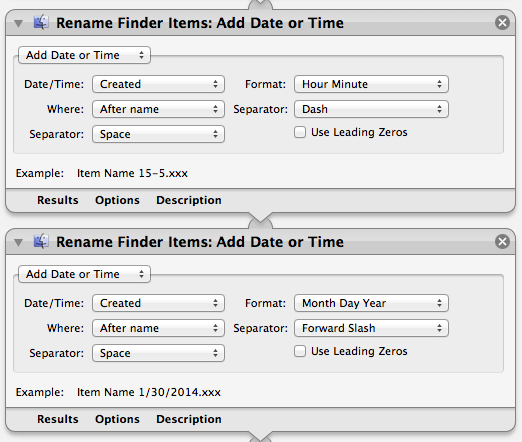
Tasks 3, 4 & 5: Rename Finder Items: Add Date or Time
Now, we want to make sure each file has a unique name by date stamping it. First, we’re going to rename the finder item as such: Add date or time > Created > Hour Minute > After name > Dash > Space. Then we’re going to rename the finder item Add Date or Time > Created > Month Day Year > After Name > Forward Slash > Space. These two tasks should look like this:
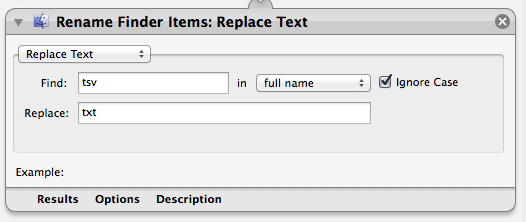
The last Rename Finder Items tab is to change the file extension. So it will go Replace Text > Find tsv in > Full Name (ignore case checked) > Replace: txt. Mine looks like this
Now, run it. Ignore the warning. You should see 6 green checkmarks at the bottom that everything has run correctly. And if you navigate to your specified folder, you should have a new file:
![]()
Save your file as something you’ll remember in the same folder that your tweets will be outputting to. Close Automator. Double click on your new application, and ignore any warnings and let it run. The file should create itself without Automator opening at this point.
7. Make tweet readable by IFTTT
IFTTT is the program we’re eventually going to use to send the Tweet, but it can’t read the content of plain text documents. Fortunately, there’s another Automator service called Zapier that can. You probably don’t have a Zapier account, so create one here.
Now, Zapier COULD turn this .txt file into a tweet ALL BY ITSELF in 1 step, BUT we’re not going to go that route. You see, Zapier only allows 100 free actions a month, and so we limit the load on Zapier and put as much of it as possible on IFTTT which allows unlimited free actions a month.
For @DrunkBuzzFeed which sends 9 tweets a day (around 270 a month), I have 3 different Zapier accounts do the work to keep it free for me. With 1 Zapier account, you can do up to 3 a day every month.
The only service you need to connect to your Zapier account is Dropbox. Do so. Then we’re going to create a new Zap. (Zapier Zaps = IFTTT Recipes). My Zap can be found here, but I’ll walk you through how to make your own.
Click “Make A Zap” and make both your trigger and action services Dropbox. Make the trigger “New File In Directory” and make the Action “Create New Text File”. Click “continue” and use the same dropbox account for both your trigger and your action.
For “Only trigger a “New File in Directory” from Dropbox when…” go choose your directory and make it where you just made your Automator task. This is a dumb process and it takes a long time to drill it down. Be patient. Don’t add any custom filters, just click “continue”
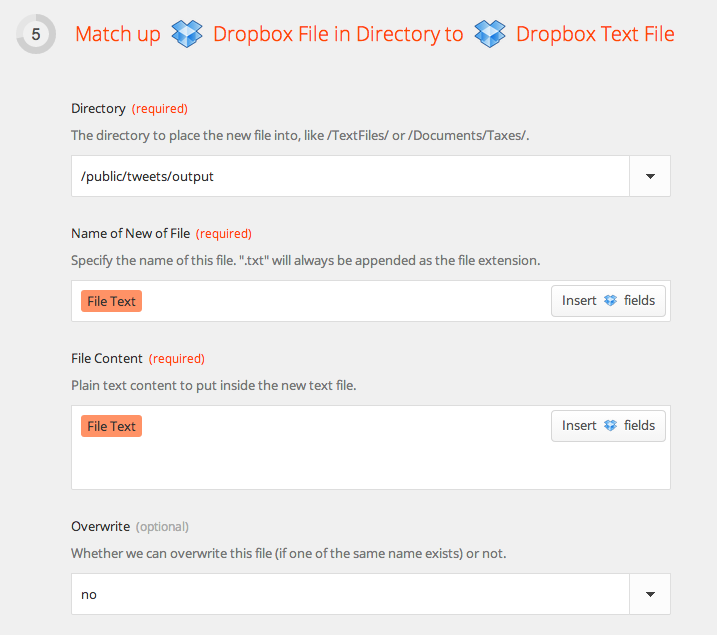
Now have it output to A DIFFERENT FOLDER. Make one in your Dropbox Public folder first in Finder, then drill down again just like you did last time to find it.
For “Name of New File” insert “File Text”. You can do the same for File Content. It should look like this:
Test it. You should end up with a new file in your output dropbox folder that’s called “(whatever the body of your old document used to be).txt”. Deep breath. We’re almost there.
8. Send the Tweet
We’re heading back to IFTTT for steps 8 and 9. This first one is going to take your output from Zapier and send it to Twitter. You’ll need to connect your Dropbox and Twitter accounts, but it will walk you through that. Here’s the recipe I used, but I’ll show you how to make it on your own .
Click create, then: If > Dropbox > New File In Your Public Folder > Subfolder Name wherever you have your Zapier output going > Then > Twitter > Post A Tweet > FileNameNoExt… and that’s it. You’re now to a point where if you run the Automator application you created, within 30 minutes, a tweet will show up. I say within 30 minutes, because Zapier and IFTTT aren’t checking all the time, they do it on 15 or so minute intervals. We’re not done with IFTTT yet though!
9. Make New Tweets
We can’t just send the same tweet over and over again. Fortunately, you may have noticed, your randomly generated tweet changes every time you make a change to the spreadsheet. And fortunately, IFTTT can make changes to the spreadsheet for you! Here’s my recipe that does that, but once again I’ll walk you through it.
If > Date and Time > Every Hour At > Doesn’t Matter Minutes Past the Hour > Then > Google Drive > Add Row to Spread Sheet > Spreadsheet Name “Whatever you called your spreadsheet all the way back in step 4” > Put anything in the row. It doesn’t matter what you put, just something> Get rid of Drive Folder Path if it’s in your main Drive folder and Create Action.
Now you’ll be generating a new thing every hour, whether you use it or not.
10. Schedule Tweets to run forever
You don’t want to have to run your application every time you want a new tweet published. This last step will allow you to schedule them forever, so they’ll run when you’re away from your computer (if you’re computer’s on), or while you’re at your computer and you don’t want to think about sending new tweets
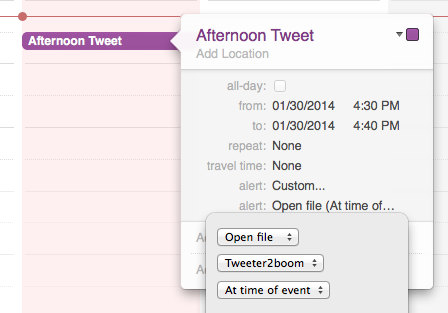
Open up Calendar for OS X. Go to File > New Calendar > On My Mac. Call it “Tweet Schedule” or whatever you want.
Right click on a time that’s like 15 minutes from now. Make a “New Event” Make sure your new event is on the calendar “Tweet Schedule” Call the event whatever you want. Make the event time short, maybe 10 minutes long. Set Alert > Custom > Open file > THE APP YOU MADE” Make it repeat every day, if you want. It should look like this: (but with Repeat on “every day”)
Now… wait for the event time. When it comes, your app will run in the background. You won’t see it. What you should see is a new file in your designated Dropbox folder. In 15 minutes or less, Zapier will take that file and rename it. 15 minutes or less after that, IFTTT will take that renamed file and tweet it. If you set this calendar event to repeat every day, you’ve created an automated twitter bot!
With 1 free Zapier account, you can send 3 tweets/day. Create 2 other additional recurring events. For every additional Zapier account you make, you’ll be able to schedule 3 more tweets/day, but you’ll have to duplicate your Automator setup into a new folder. And if everything works, that’s it!
